How to Connect a Solar Panel to an Inverter Without a Battery
04 December 2025
As a solar products manufacturer and exporter, I come across hundreds of questions every day—from homeowners, business owners, installers, and even new solar dealers. But one question stands out in popularity:
“Can I connect a solar panel directly to an inverter without using a battery?”
While the idea sounds simple—use solar power directly during the day and avoid the cost of a battery—the actual implementation requires proper understanding, the right inverter design, and safe wiring practices. Since we are also a battery, inverter and online UPS manufacturer, along with solar inverters, tubular batteries, lithium-ion batteries, and many other solutions, this topic is something I explain often.
In this detailed guide, I’ll walk you through everything clearly:
-
Whether connecting solar panels to an inverter without a battery is possible
-
Which type of inverter supports this
-
How the wiring works
-
What safety precautions to take
-
Whether it’s the right choice for your home or business
Let’s dive into it step by step.
Can You Connect a Solar Panel Directly to an Inverter Without a Battery?
The short answer is:
Yes, you can—but only with the right type of inverter.
You cannot connect solar panels directly to:
-
A normal home inverter
-
A basic UPS
-
An offline/line-interactive online UPS
However, you can connect solar panels directly to a dedicated grid-tie inverter (GTI) or hybrid solar inverter designed to work without batteries.
These inverters are engineered to synchronize with solar panels and the grid, ensuring stable output even when sunlight fluctuates.
Which Inverters Support Solar Panel Connection Without Battery?
Based on my experience in solar manufacturing, there are two types of inverters that can operate battery-less:
1️⃣ Grid-Tie (On-Grid) Solar Inverters
Grid-tie inverters are built specifically to work without a battery.
They take DC power from solar panels, convert it into AC, and feed it into your home and the grid.
They require the grid to be present, otherwise they shut down for safety (anti-islanding).
Best for:
-
Homes with reliable electricity
-
Commercial buildings
-
Factories
-
Offices
Not suitable for:
-
Areas with power cuts
-
Villages or remote regions
2️⃣ Hybrid Solar Inverters (Battery Optional)
These modern inverters can work:
-
With battery
-
Without battery
-
Grid-only
-
Solar-only
-
Solar + grid
We manufacture hybrid inverters that allow you to use solar directly in the day even without connecting a battery. They intelligently manage solar power and grid supply so your appliances run smoothly.
Why Do Some People Want to Skip the Battery?
As a solar products manufacturer and supplier, I have noticed three main reasons:
1. To Reduce Initial Cost
Batteries—especially lithium-ion batteries—add a significant cost.
Skipping them reduces installation cost by 30–40%.
2. For Daytime Use Only
Some users only want to run:
-
Fans
-
Lights
-
Computers
-
Shops and offices
-
Factories
…during the day
No need for night backup = No need for a battery.
3. For Export Power (Grid Feed-In)
Industries with net metering prefer grid-tie systems which don’t require batteries.
How Does a Solar Panel Work With an Inverter Without a Battery?
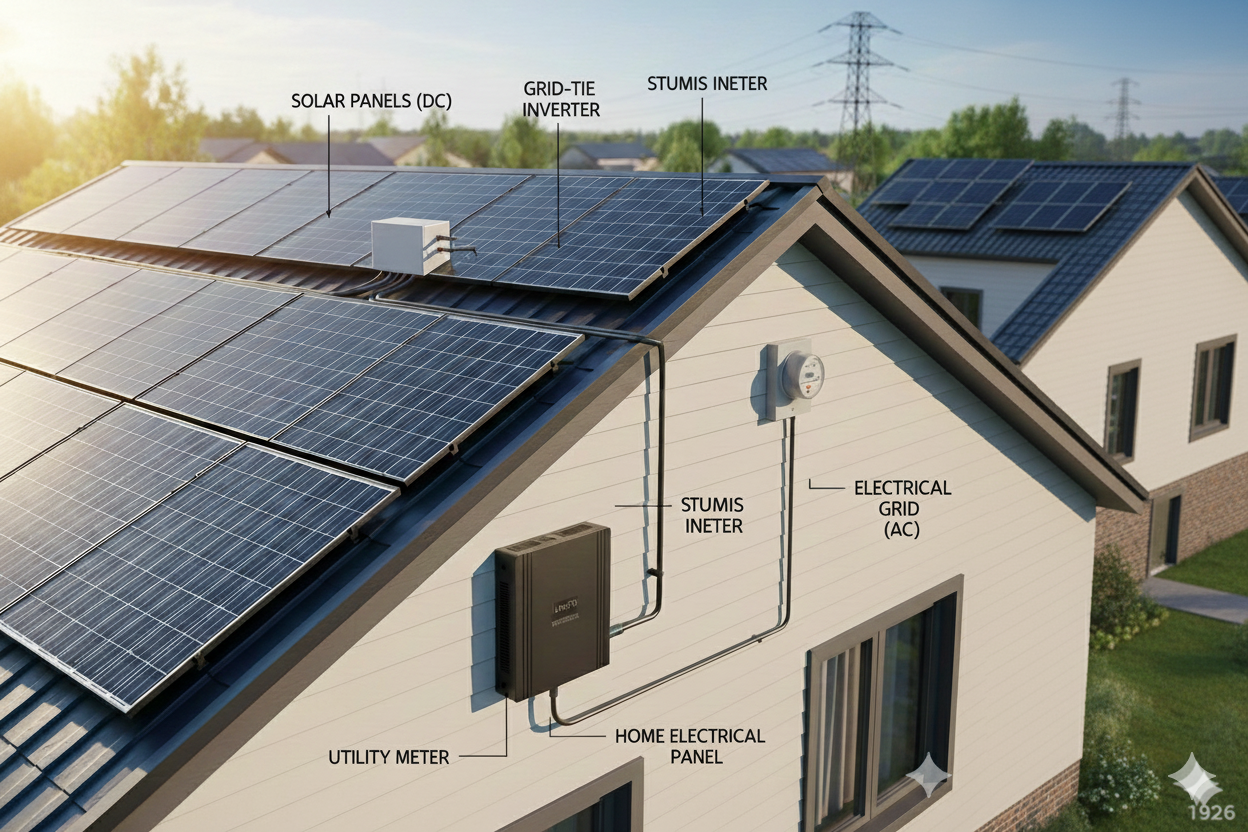
Connecting solar panels without a battery depends on inverter design. The basic flow looks like this:
Solar Panels → Solar Inverter (GTI or Hybrid) → Home Appliances + Grid
Here’s what happens:
-
Solar panels generate DC power.
-
The inverter converts DC to AC power.
-
Appliances in your home use solar electricity directly.
-
Any extra power (in grid-tie systems) goes to the grid.
There is no battery in between.
Sunlight determines how much power is available.
Step-by-Step: How to Connect a Solar Panel to an Inverter Without a Battery
This is a practical, easy explanation—not an electrical diagram.
Always hire a certified installer.
Step 1: Choose the Right Inverter
Select either:
-
Grid-tie (on-grid) inverter, or
-
Hybrid solar inverter (battery optional)
Since we manufacture both, I always recommend checking:
-
MPPT rating
-
Voltage window
-
Certification
-
Load capacity
-
Surge protection
-
Warranty
Step 2: Connect Solar Panels in Series / Parallel
Your solar panels need to match:
-
Inverter’s voltage range
-
Inverter’s current capacity
MPPT controllers inside the inverter require correct input voltage. Your installer will design:
-
Series connections for voltage
-
Parallel connections for current
Step 3: Connect Panels to the Inverter's MPPT Input
All modern solar inverters use MPPT technology (Maximum Power Point Tracking) to ensure:
-
Higher efficiency
-
Stable output
-
Safer operation
Panels plug into the MPPT input section.
Step 4: Connect the Inverter to the Grid
This is mandatory for grid-tie inverters.
They cannot work without grid presence.
Hybrid inverters can work in:
-
Solar-only mode
-
Grid + solar mode
-
Grid-only mode
But for direct solar use without batteries, they still need grid availability.
Step 5: Connect the Load Output
This output goes to:
-
Home appliances
-
Office equipment
-
Commercial loads
During sunlight, appliances run directly on solar power.
Step 6: Turn On the System and Monitor Performance
Most hybrid and grid-tie inverters come with:
-
WiFi monitoring
-
App control
-
Real-time energy tracking
You can check how much solar power is being used.
Advantages of Running a Solar System Without a Battery
Choosing a battery-less configuration offers some great benefits:
1. Significantly Lower Cost
Batteries can be 40–50% of system cost.
Skipping them reduces investment.
2. Zero Battery Maintenance
No:
-
Water topping
-
Corrosion
-
Replacement costs
-
Safety issues
This is ideal for industries and commercial users.
3. Maximum Efficiency During Day
All solar power is used directly—no conversion losses.
4. Long System Life
Without batteries, there are fewer components to maintain.
Limitations of Not Using a Battery
As a manufacturer, I always explain both pros and cons.
1. No Backup During Power Cuts
If the grid fails, the inverter shuts down.
2. Solar Wastage Without Load
If your appliances are off, solar power is wasted (unless net metering is available).
3. Not Ideal for Rural/Low Grid Areas
Battery-less systems need stable grid voltage.
4. Limited Night-Time Benefits
Solar without battery = daylight-only usage.
Should You Use Solar Without a Battery?
Here’s what I advise customers:
Choose battery-less solar if:
-
You live in a city with 24×7 electricity
-
You primarily use appliances during the day
-
You want low investment
-
You want to reduce electricity bills
Use solar WITH battery if:
-
You live in a power-cut prone area
-
You want backup
-
You need night-time usage
-
You run sensitive equipment
Since we manufacture both tubular batteries and lithium-ion battery packs, we offer solutions for both types of users.
Best Inverter for Running Solar Without Battery
From our product range, I always suggest:
Lento Hybrid Solar Inverter
(Solar + Grid, battery optional)
Why?
-
Works with or without battery
-
MPPT controller inside
-
High efficiency
-
Stable output
-
Ideal for homes and businesses
-
Supports future battery addition
This gives you flexibility—start without battery, add one later.
Final Thoughts
Connecting a solar panel to an inverter without a battery is a smart and cost-effective choice—if you have the right type of inverter and if you live in an area with reliable electricity. Grid-tie and hybrid inverters make this setup safe, efficient, and practical.
As a solar products manufacturer, exporter, and supplier, and as a company that manufactures tubular batteries, lithium-ion batteries, solar inverters, online UPS, and many more products, we design systems for all types of customer needs—whether battery-less or battery-based.
If you want expert guidance for your home or commercial project, I’m always here to help.